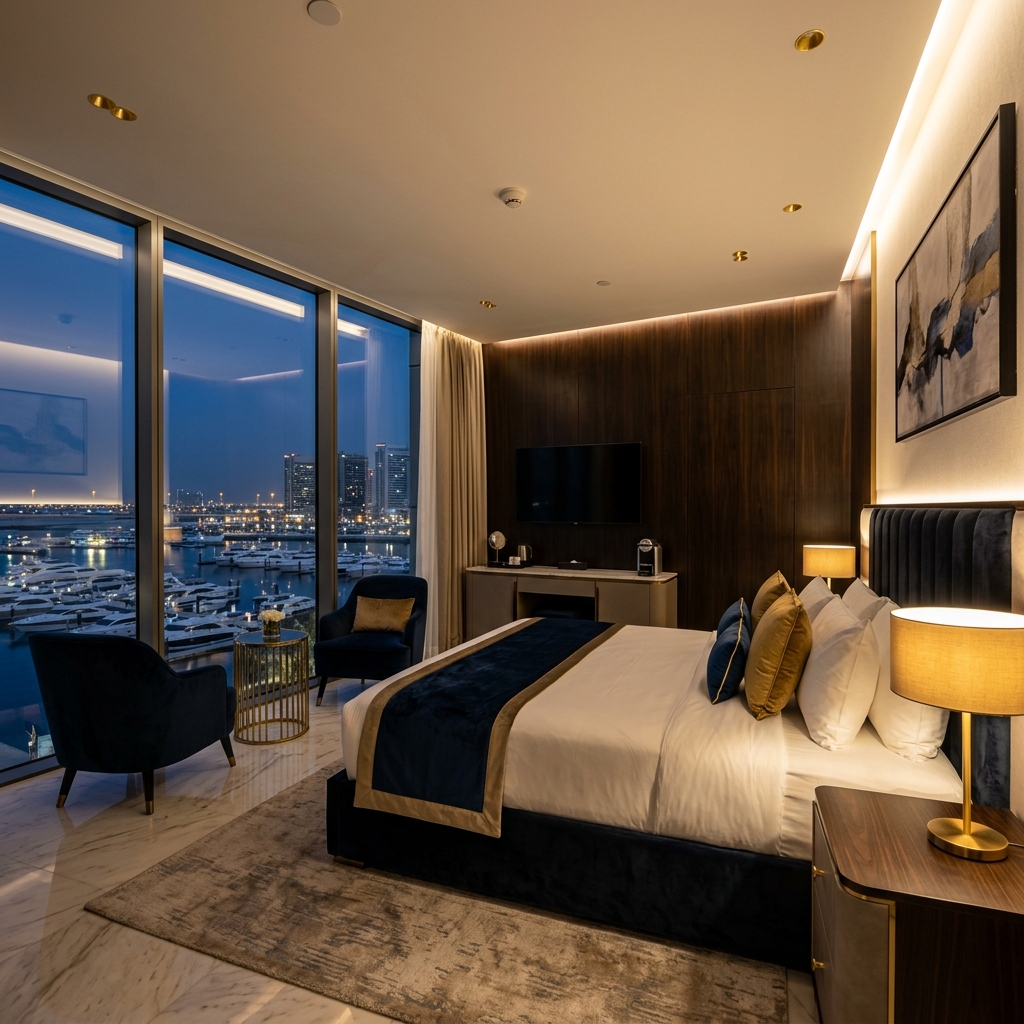
12 Steps to Repair Fiberglass Boat Hull From The Outside

Have you noticed a hole in your boat’s hull?

Seeing your boat damaged can send you into a panic, especially when you think about how complicated and expensive it must be to repair a fiberglass boat hull.

Admittedly, fiberglass is a tough material, and once it is damaged, you will have to put in more work to repair it than you would, say, a wood boat.

But, the good news is small holes and cracks on a fiberglass hull are completely repairable. Even if you don’t consider yourself handy, repairing minor damage on your boat is a skill you should learn.

In this article, I will show you how to repair a fiberglass boat hull from outside. Doing your repairs outside of the boat is the best strategy for dealing with a small hole or crack that hasn’t gone past the hull to the boat’s interior.

Here, I will explain how to repair your fiberglass hull using layers of fiberglass fabric as a long-term solution to seal the damage.

So, without further ado, let’s get started.

Things you will need for fiberglass hull repair

  • Polyester resin fiberglass repair kit
  • Fiberglass rubbing compound
  • Acetone
  • 7 ½ fiberglass cloth
  • Plastic wrap
  • 10-ounce roving
  • Masking tape
  • Disc sander with a medium grit sanding disc
  • Pair of scissors
  • Gel coat
  • Soft rugs
  • Paintbrushes
  • Extra fine-grit wet-dry sandpaper
  • Light cardboard

Step-by-Step Guide To Repair Fiberglass Boat Hull From the Outside

Follow these steps to repair a damaged fiberglass boat hull.

Step 1: Grind around the hole

Grind around the hole

Use a disc sander and a medium-grit sanding disc to grind around the hole. This helps to expose the undamaged fiberglass underneath and create a strong base to place the fiberglass patch for repair.

Smoothen the edges of the hole into the surface of the exposed fiberglass. The outside edges of the original hole should be at least 3 inches wider than the inside edges. Tapering the hole ensures that the fiberglass patch strongly adheres to the surface.

Step 2: Clean the damaged area

Clean the damaged area

Use a soft rug to wipe off the dust after sanding the hole to satisfaction. With all the dust wiped out, soak another soft rug in acetone and use it to wipe around the damaged hole.

Be extremely careful when working with acetone. This product is flammable and should only be used in a well-ventilated area.

Dispose of the rugs containing acetone outside as soon as you finish using them.

Step 3: Back up the hole

Back up the hole

Fill the hole with a piece of cardboard before applying the fiberglass fabric. Cut the light cardboard to be two inches bigger than the hole.

Ideally, the fiberglass fabric should not stick to the cardboard paper. To help with this, cover the piece of cardboard with plastic wrap and tape the wrap, so it adheres.

Insert the wrapped cardboard into the hole completely. Adjust the piece of cardboard as needed to adhere to the shape of the hole. Then, hold it in place using masking tape. The cardboard should fit in the hole snugly to ensure a strong patch.

Step 4: Prepare the patch

Prepare the patch

In this repair project, the goal is to patch the hole with fiberglass cloth and woven roving.

To get started, cut a piece of 10-ounce roving to the size of the hole’s inside diameter. You will patch up the hole with several layers of roving. So cut several more pieces of roving, making each successive piece slightly larger.

The number of roving pieces you will need will depend on the hull’s thickness. When layered one on top of the other, the roving pieces should get to a point where they are flash or level with the undamaged surrounding hull surface.

Once you have prepared enough roving pieces, cut a piece of the fiberglass cloth which will act as the final top layer of the patch. The goal is to blend the fiberglass cloth into the hull’s fiberglass surface.

Lay the roving and fiberglass pieces on a clean work surface. Arrange them in order from the smallest to the largest piece.

Step 5: Prepare the resin

Prepare the resin

Follow the manufacturer’s instructions to mix the hardener and polyester resin. This resin mix hardens up fast, and you should only prepare a small batch at a time that you can use quickly.

Keeping the temperatures in your workspace at not lower than 600 F will help slow down the hardening process.

Step 6: Apply the layers of roving

Apply the layers of roving

With the pieces of roving and resin ready, it is time to patch up the hole.

Place the smallest piece of roving on a piece of cardboard. Use a paintbrush to apply resin to this first layer of roving. Thoroughly brush the resin so that it saturates the piece of roving.

Lift the roving and place it on the gaping hole on the boat’s hull. Use the paintbrush and gently press the roving to adhere to the hole and surrounding hull. Continue to massage the roving with the paintbrush for a few minutes to help the piece adhere.

Pick up the next piece of roving and apply enough resin as you did the first piece. Then, place this piece on top of the first piece on the hole. Massage and tape the edge as above.

Repeat this process for all the pieces of roving you have prepared. In the end, the last layered patch should lay level to the surrounding hull.

Step 7:  Apply the fiberglass cloth

Apply the fiberglass cloth

The final layer of the patch will be the fiberglass cloth. Pick up the piece of fiberglass cloth and place it on top of the layers of roving.

You don’t need to apply resin to the fiberglass cloth. Simply use the resin-saturated in the roving pieces. Use a paintbrush to massage the fiberglass cloth into the roving.

If the fiberglass cloth doesn’t seem to adhere to the hull around the edges, you can add a small amount of resin. Be careful not to use too much resin, which will eventually weaken the patch.

The resin-saturated roving and fiberglass will turn a dark hue; don’t worry about this. It only means that you have applied enough resin to reinforce the patch.

Step 8: Allow the patch to dry and remove irregularities

Allow the patch to dry and remove irregularities

Give the patch enough time to dry. Ideally, you should allow the resin a drying time of at least 10 hours or as recommended by the manufacturer.

Use a disc sander with a medium-grit sanding disc to smoothen out the surface and edges of the patch. The idea is not to grind down the patch but to slightly sand it to be level with the hull’s surface if necessary.

Further, smoothen the surface of the patch using a very fine-grit wet-dry sandpaper. Do this gently, taking your time to remove any lingering irregularities.

Step 9: Clean the patch

Clean the patch

Clean it with acetone once the patch is completely level with the surrounding hull. Be sure to keep your work area well-ventilated and safely dispose of any rugs that come into contact with acetone.

Step 10: Apply the gel coat

Apply the gel coat

The gel coat is the final finish that helps seal the patch and bring it to match with the hull’s color and texture.

Follow the manufacturer’s instructions on preparing the gel coat. Apply a thin coat of the gel onto the patch. Brush the gel over the patch, ensuring that the layer is even. One layer of gel coat is enough.

Next, apply plastic wrap over the layer of wet gel, pressing down and smoothing the wrap to remove air bubbles and crinkles. Apply two more layers of plastic wrap over the patch, ensuring no air bubbles are trapped underneath.

The plastic wrap plays an important role in ensuring the gel coat dries smoothly to resemble the original fiberglass boat hull.

Step 11: Remove excess gel coat

Remove excess gel coat

Allow the gel coat to dry for at least 10 hours or according to the manufacturer’s instructions. Then, take off plastic wrap to reveal a smooth patch surface.

Use very fine-grit wet-dry sandpaper to sand down the gel-coated patch. This will remove excess gel and ensure that the patch is at the same level as the hull’s surface. Use enough water when sanding the patch to avoid scratching the gel layer.

Step 12: Clean and wax the hull

Clean and wax the hull

Use a wet cloth to clean the repaired area.

Then, apply fiberglass rubbing compound to this area and use the disc sander’s buffer to polish the surface.

Lastly, apply a wax product such as good old automotive wax to shine the newly repaired spot.

Summary: How To Repair Fiberglass Boat Hull From Outside

Knowing how to repair a fiberglass boat hull can avert a potential boating disaster and even save you some money. You can quickly fix a hole you hadn’t noticed and save the bigger repairs for the professionals. I strongly recommend storing boat repair materials and tools on board in case of an emergency repair. I hope this guide will come in handy when you need to fix a hole in your boat’s hull. Happy sailing!

Leave a Comment